Creating OmniFocus projects from templates and calendar events
Today I want to showcase one of my most favorite automation workflows I am regularly using on my iPad.
When preparing regular events or projects in your task management, it might often be helpful to create templates for frequently occurring tasks.
For example, if you need to prepare some materials for every group meeting, why not have a preset or a mock-project from which you can copy-paste an instance every time you need it. This way, you won’t forget some small task which might be forgettable yet essential.
In this article I’ll go over the process to create templates for new OmniFocus projects, and how to connect it to calendar events for more conveniently creating new projects based on new calendar entries in one click.
My example use-case
At university, I have irregular meetings where I discuss my research progress and thus often want to prepare some materials in advance, like figures, handouts, or some result graphs.
After each meeting, I’ll also want to take some after-notes, create a project for the next one, and maybe do some literature research or review my OmniFocus projects related to research.
Yet, each meeting is usually on an irregular time-schedule, so repeating projects would not work that well.
To simplify this process and make sure that I will not forget any critical steps in the preparation, I created an OmniFocus template for it.
Furthermore, for convenience, I used the app Shortcuts (iOS) to create a new project from the template for the latest calendar entry. This way, I can create a similar OmniFocus project for a new calendar entry with a single click. It uses the title of the calendar entry and its date-time to automatically fill in the project name and due dates.
Templates and OmniFocus 3
First of all, templates are not a widely advertised feature of OmniFocus 3. But, with a trick, they are easy to create. See, for import, OmniFocus supports the so-called TaskPaper format. Coming from a popular Mac task management app, which works entirely text-based, this format allows to encode projects and its tasks in a text format. It also supports meta-data like due dates and more.
More concretely, it looks like this:
- Prepare Media GM (Apr 25, 2019 13:30) @parallel(true) @autodone(true) @flagged
    - Preparations @parallel(true) @autodone(true) @due(Apr 25, 2019 13:30)
        - Create handout @parallel(true) @autodone(false)
        - Print handout @parallel(true) @autodone(false)
    - After meeting @parallel(true) @autodone(true) @defer(Apr 25, 2019 13:30)
        - Create project for next meeting @parallel(true) @autodone(false)
        - Take some after-notes @parallel(true) @autodone(false)
        - Review OF based on discussion @parallel(true) @autodone(false)
The first line is the project name, while the indented lines will result in tasks or sub-tasks. All meta-data is added in the form of tags. It would also be possible to create multiple projects or various layers of tasks and sub-tasks using this indented format.
The example results in this OmniFocus project:
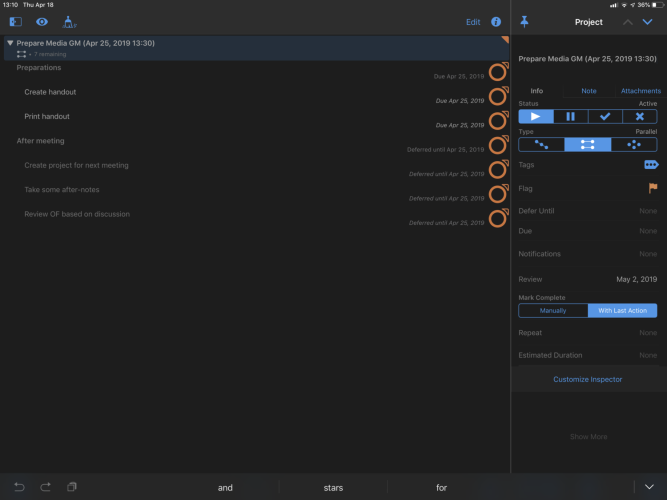
TaskPaper is directly supported by OmniFocus. You can copy-paste the TaskPaper format directly into OmniFocus. All meta-data can be described in some form of TaskPaper tags. You can also create a TaskPaper format template by copying an OmniFocus project into a text editor.
On iOS, this behavior can also be combined with external apps (like Scriptable or Shortcuts) to use templates from more sophisticated workflows involving automation.
There is a reference on the website of The Omni Group.
Template automation and text-replacement
In this article, I want to shift the focus on the application Shortcuts, which is created by Apple and one of the main ways to use automation on iOS devices.
You can use it to automatically grab a previously created OmniFocus template and re-create a project. For example, you can save the example above to a text file, put it to Dropbox, and then connect it to OmniFocus to create a new project from it:
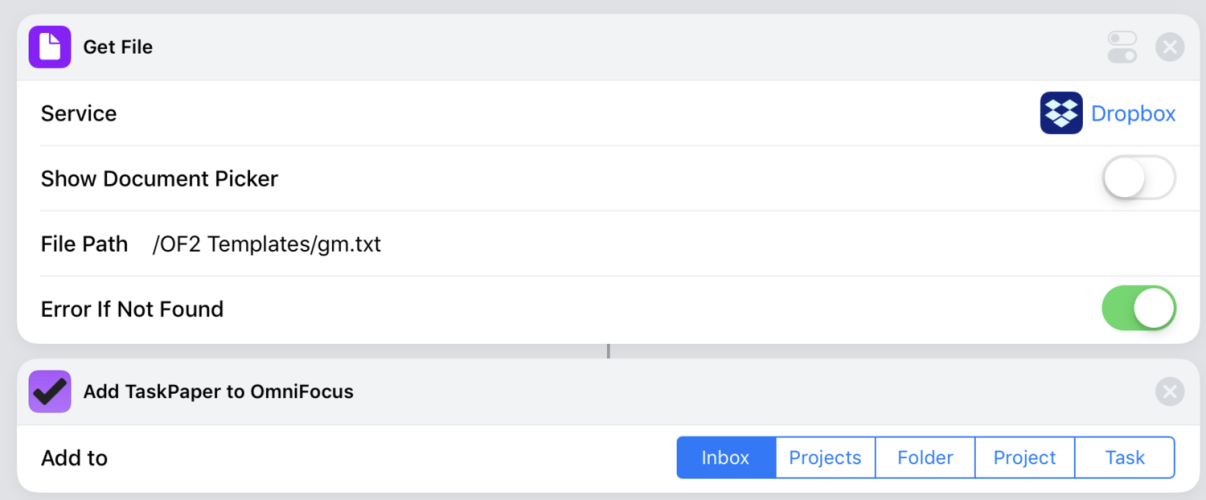
However, that would not be the most exciting workflow, as it would always create the same project, including the identical project name and due dates.
To make it a bit more dynamic, you can use text-replacement. The idea is the following: Have a dummy parameter value in your template. You can use some weird brackets which are not part of your standard text to indicate that it is some placeholder.
As an example, let’s modify the example above:
- Prepare «GMName» («GMDate») @parallel(true) @autodone(true) @flagged
    - Preparations @parallel(true) @autodone(true) @due(«GMDate»)
        - Create handout @parallel(true) @autodone(false)
        - Print handout @parallel(true) @autodone(false)
    - After meeting @parallel(true) @autodone(true) @defer(«GMDate»)
        - Create project for next meeting @parallel(true) @autodone(false)
        - Take some after-notes @parallel(true) @autodone(false)
        - Review OF based on discussion @parallel(true) @autodone(false)
Instead of the preset name and dates, we added GMName and GMDate as placeholders. If we change their values on-the-fly, we can create dynamic automation to fill in the correct name and dates, while the tasks themselves are preset for their use-case.
Notice, that I used the GMDate placeholder multiple times, which is intentional. You can use parameters in numerous locations, and also for different reasons. For example, in the first line, it will add a due date, whereas further down, it will create a defer date for a sub-tasks using the same numerical date-time value.
To mark each placeholder, I chose the brackets «» to indicate that this is not real text. This is important for your automation script to find and replace the placeholders.
Using some Shortcuts automation magic, it is possible to find-and-replace these variables with some other text.
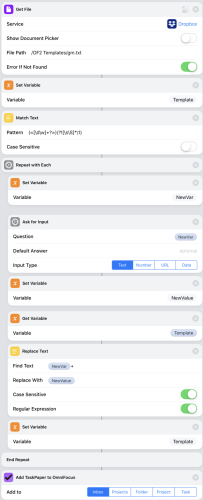
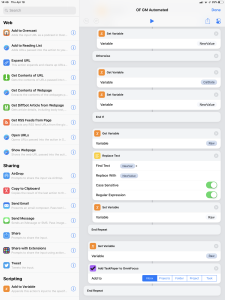
Now, this is a heavy one, so please bear with me for a moment. So, what does it do?
The template is loaded to a variable called Template. Then, we match the text, basically finding each occurrence of our parameter-indicating brackets «». For each one found, it will do a repeating number of actions.
So, first, it will find «GMName». It will set NewVar to GMName. Then, it will ask the user what to replace it with. Here, you can dynamically change the contents of your to-be-generated project. Then, it will save the user input to NewValue. Using the Replace Text function, it will replace the contents of «GMName» with the previous input data.
Second, it will rerun the same lines for «GMDate». If you have more occurrences of «» in your preset, it will run it once for each placeholder, replacing each of its occurrences. Beware, my example uses «GMDate» three times in the same template. It will only ask once but replace all three occurrences of «GMDate» with your input.
Lastly, after finishing the replacement for each placeholder, it will paste the resulting template to OmniFocus. It is created on the fly, so if you re-run the script, it will ask for input again, allowing you to generate projects dynamically.
The script from the screenshot can be found over here. Keep in mind, that you need to adjust the location of your template file (Dropbox, iCloud,) before it runs.
Connecting the automation to calendars
Ok, the majority of automation has been done. Lastly, I showcase some way to connect the workflow to your calendar.
In my example, I want to create a calendar event for each event containing “GM” (which stands for group meeting.) Thus, first, I will search for the newest calendar event using a “Find Calendar Events where” action.
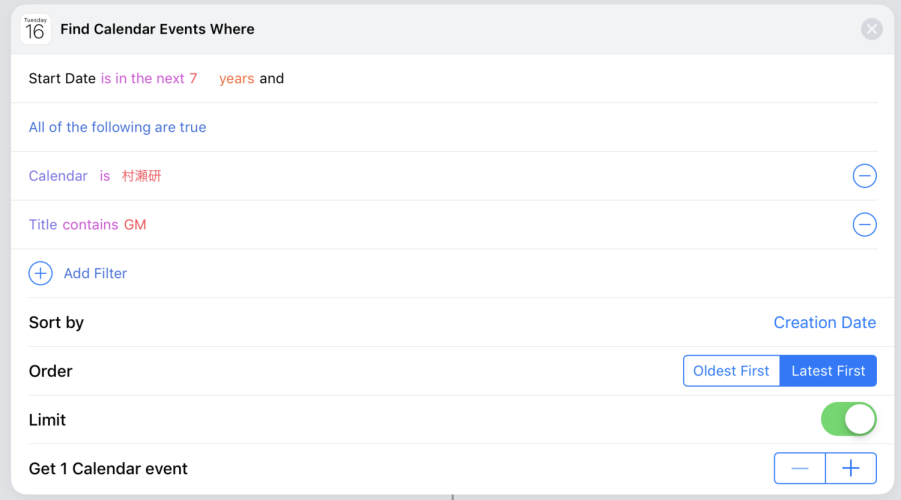
Of course, all the settings are individual, and you’ll need to change them to reflect the way you want to use this automation.
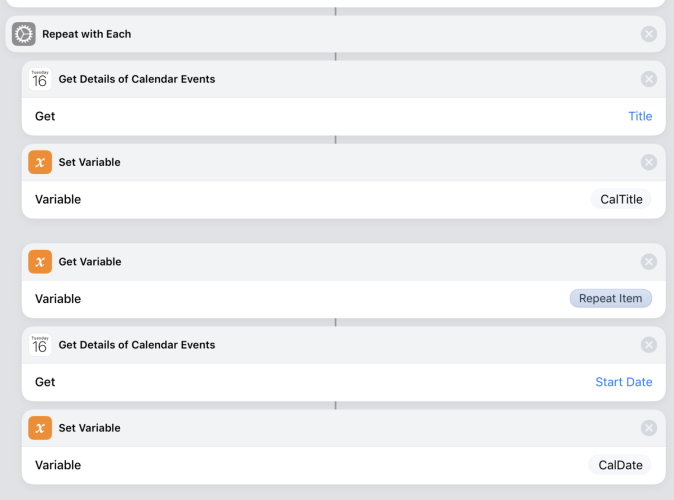
Next, I feed in the name and start date of the calendar event to two variables called CalTitle and CalDate. I use a repeat loop, so I can quickly change the Shortcut to work for multiple calendar events, but any way to assign variables would do.
Lastly, I change the repeat loop of the text replacement explained above. Instead of asking for user input, I’ll fill in the CalTitle variable, if the placeholder name is GMTitle, or the CalDate variable, if the placeholder name is GMDate.
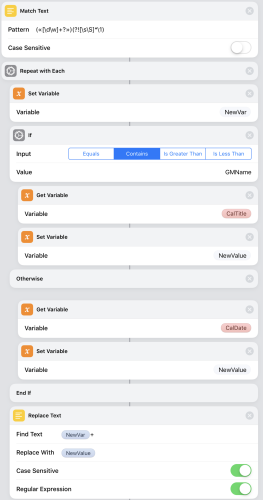
Thus, using this Shortcut workflow directly after creating a new calendar event, it will grab the name and date of the calendar event, and uses the preset OmniFocus template to create a new project for the corresponding task.
For example, a calendar event with the name “Media GM” on April 25, 2019, from 13:30 to 15:00 will create a project with the title “Prepare Media GM (Apr 25, 2019 13:30)” using the template provided above.

Here is the full script:
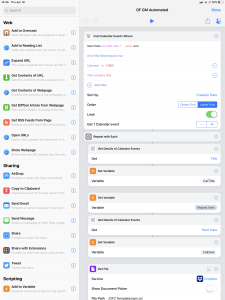
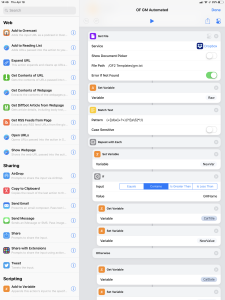
The iCloud link to the script is over here. Keep in mind, that you need to adjust various locations, like the calendar details, the template location, and so on. But you can use it for reference.
Notice, that it also won’t fully automatically create projects for new calendar entries, so you still need to do the manual click in the Shortcuts overview after entering things into your calendar.
There is also no checking whether a project was already created, so it will create duplicates if run multiple times in a row. It will always create a project for the last calendar entry, though. So, if preparing numerous meetings, you can alternate between adding them to your calendar and firing the Shortcut workflow.
Next steps
So, for reference, here the two scripts:
From here on, you could change the templates, add additional steps, or change the way the Shortcuts workflow handles calendar entries. For example, one could handle multiple calendar entries at the same time, but you then probably need to make sure to not accidentally create duplicate projects.
Another thing, which could easily be added, is a selection box for multiple templates. The “Get File” command in Shortcuts already provides a Document Picker option, which would give you a popup box and ask you which preset to use.
Furthermore, one could also try to match the preset name to the meeting name. Then, it could be matched to the correct one without using the Document Picker.
Any questions? If you need any help, please feel free to ask in the comments! Otherwise, share your scripts or ideas on how to use automation on the iPad!
Disclosure: This post may contain affiliate links. This means I may make a small commission if you make a purchase.
About me

Marc
I am a lecturer in field of computer science. I am interested in task- and knowledge management. Sometimes, I blog on productivity workflows, apps, and other related non-work stuff I'm working on.
See Also
An Overview on Automation
When using a multiple of productivity apps, the number of inboxes can get overwhelming. An email from a supervisor and a related task in a …
Read More...Sending emails to your task management inbox
Capturing new tasks is an important habit needed for successful use of a task management software. Many tasks in daily life involve …
Read More...Exporting Markdown from OmniOutliner
Both for my day job as a researcher, as well as for this website, I often prepare papers and articles by first writing an outline. In an …
Read More...